CATFENCE is the exclusive New Zealand distributor of PURRFECT FENCE®.
Installing your Purrfect Fence® fence-mounted system
Purrfect Fence is simple to install, requiring only a few basic handtools. We provide full instructions with your order, but this page will give you a good introduction.
Who can install Purrfect Fence?
You can!
If you’re a DIYer with a few basic tools, installing Purrfect Fence is a breeze. We’ll show you how on this page.
Your local handyperson
Take a quick look
For an introduction to Purrfect Fence installation, check out this short video, which shows a Standard Height system being installed on a chain link fence.
For more details, see the Step-By-Step video below.
We also recommend that you download and print the Installation Guide for your type of Purrfect Fence kit, either Standard Height or Low Fence version.
Standard Height Kits
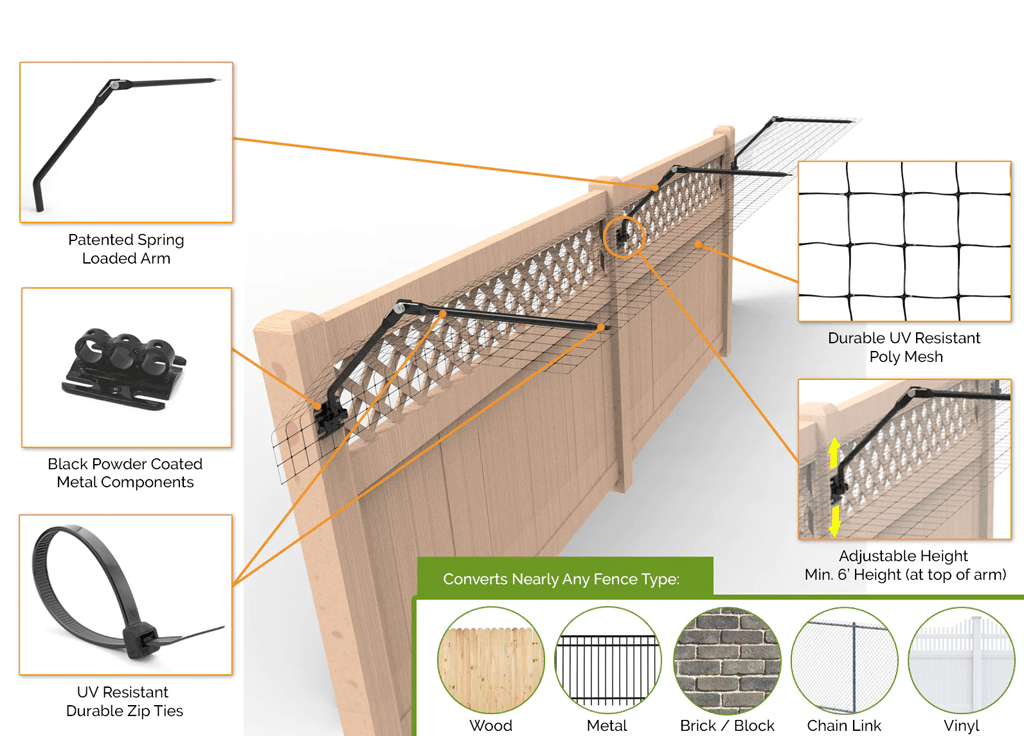
If your fence is at least 1.6m tall, use our Standard Height kits (which will result in a finished height of 1.8m or more).
Low Fence Kits
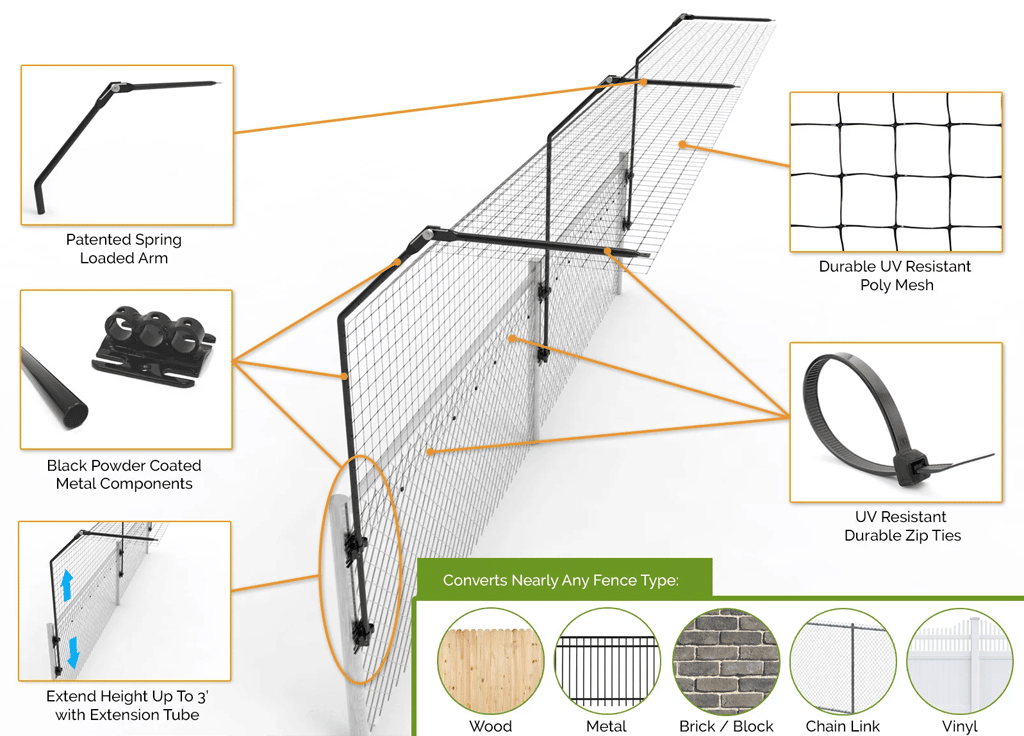
This system uses extension poles and wider mesh, so it works on fences as low as 1 metre!
Ready to DIY? Here’s what you’ll need
- Tape measure
- Marker pen (fine tip) or pencil
- Screwdriver and screws to attach mounting plates to your fence
- Cordless driver drill, if desired
- String for marking straight lines on sloping or stepped fences
- Snips for cutting and trimming mesh
- Zip tie puller, if desired
- Staple gun and staples for securing the lower edge of mesh to timber fences, alternatively timber or vinyl strapping to secure to walls or metal/PVC fences
Step-by-step guide
Here’s a highly detailed, but easy to follow, explanation of how to install your Purrfect Fence on any type of fence.
You’ll learn how to tackle corners, gates, and changes in height or slope.
It’s like going to Purrfect Fence University!
Key points to remember
If you have exposed fence posts, you will probably attach the Purrfect Fence arm mounting plates to them. The maximum span between arms is 4m, although 3m is preferred. Count and measure the distance between your posts to ensure that a kit will cover your fence.
Purrfect Fence works by forcing your cat(s) to climb up the fence which activates the spring-loaded arm if they are able to reach the top (most are not.) So, for maximum effectiveness, it is important that the finished height of your Purrfect Fence be tall enough so your cat cannot simply leap over it. For most domestic cats the minimum finished height (measured from the ground to the tip of the Purrfect Fence extension) we recommend is 1.8m. Even so, we have had customers tell us it was effective for their cat(s) at shorter heights.
The arched shape of the arms will provide approximately 25cm additional height from wherever the mounting bracket is secured. So, if the bracket is mounted at the top of a 1.8m fence, then the finished Purrfect Fence height can be as tall as 2.05m. The finished height can be adjusted by simply changing the height of the mounting bracket.
Fasteners for attaching Purrfect Fence to your existing fences or building are included.
Gates require special consideration. See below for more information on gate planning and installation.
Don’t forget, you are welcome to contact us for free advice on planning or installing your system.
Inside corners
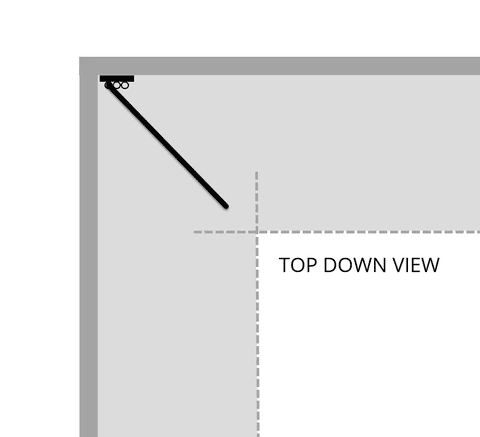
Inside corners (usually 90 degrees, but can be 80-180 degrees) typically require one spring-loaded arm, positioned to split the corner in 2 halves. Inside corners less than 80 degrees need special treatment (see installation video).
Outside corners
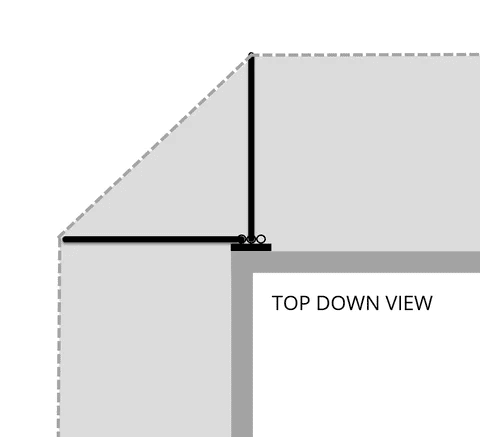
Outside corners are greater than 180 degrees and require 2 or more spring-loaded arms.
Gates that open inward
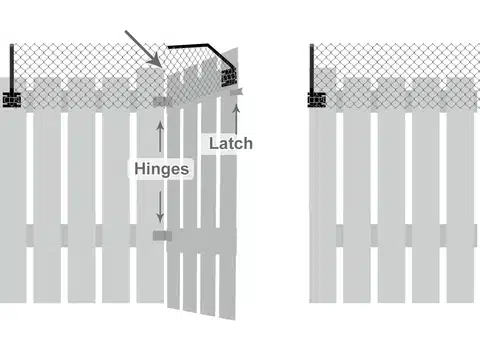
For most inward swinging gates, you will need to install two spring-loaded arms side-by-side on the latch side of the gate. One arm will be on the latch post, while the other will be on the latch side of the gate itself. When the gate swings open, the mesh material should bunch at the hinge side of the gate (marked by the arrow above). Note that there is no arm near the hinge side of the gate.
Gates that open outward
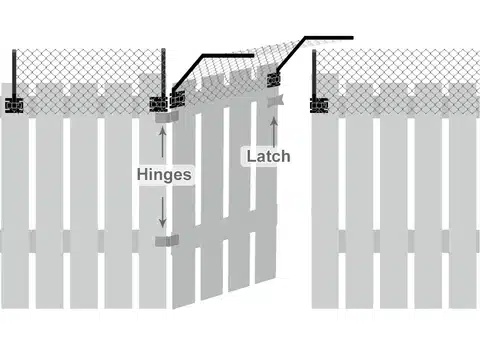
For most outward swinging gates, you will need to install two sets of spring-loaded arms on each side of the gate. One arm will be located on each post on both sides of the gate (one on the latch post and one on the hinge post). Then, there will be an arm on each side of the gate itself, mounted slightly higher than the arms on the posts. When the gate closes, the arm on the latch side of the gate swings over the fence.
